It’s been quite a while since I’ve posted anything new, and I’ve been so overwhelmed with where to start, I found it easier to just not post anything. So, let’s break the ice by taking about this little Kato NW2 that I have.

I picked up Kato 176-4367 NW2 CB&Q #9205 from one of Tim Timmin’s (https://facebook.com/timcovintagetoys) auctions (https://www.facebook.com/groups/788138575282126) back in August of 2020. It was actually the first auction of his where I bought something!
I’ve always been a fan of little switchers, and knowing that my layout is going to be comprised of T-Trak modules with fairly tight curves, I’ve been naturally drawn toward smaller locomotives. I’ve actually set a personal rule of not getting anything larger than a 4-axle engine.
Back to the NW2. It was DC at the time, but I knew that it was convertible to DCC with only a little effort. It was also missing one coupler, and the other coupler was one of the stock Kato knuckle couplers, which from what I understand aren’t that great anyway (I’ve heard they don’t couple consistently to other types of knuckle couplers).
I still didn’t have a layout at the time, and was slowly (very slowly) working on my T-Trak modules, so it just sat in a box along with everything else.
Finally, last month (February 2021), I started to get motivated. I picked up a Digitrax DN123K3 decoder and Micro Trains 001 02 052 (2004) coupler conversion kit from PnP Trains (https://www.facebook.com/pnptrains) and got to work!
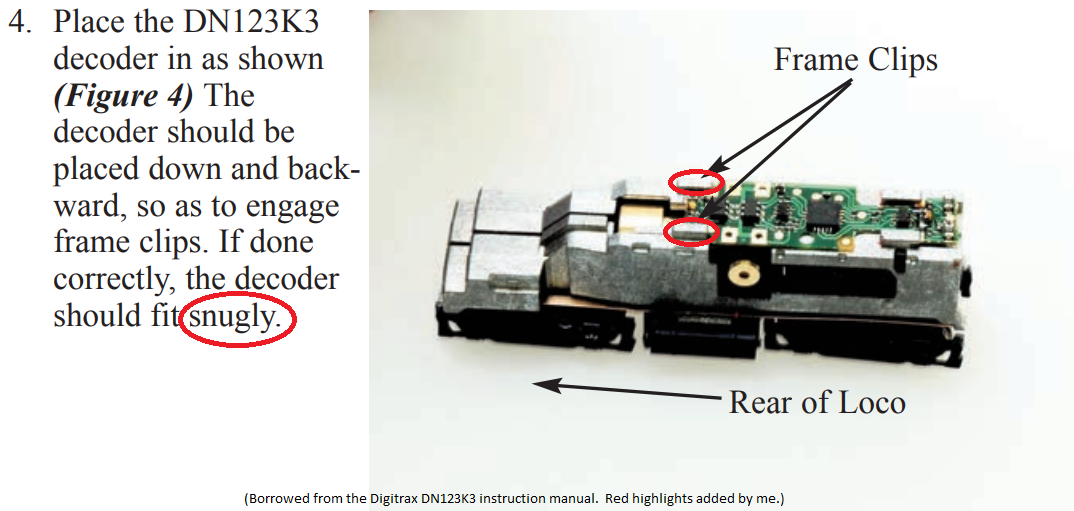
I’ve got to hand it to Digitrax (https://www.digitrax.com/); they make great products, have a great warranty, and their instructions are pretty detailed as well. With some patience, I was able to get the shell off without any issues, and it was pretty obvious what I needed to do once I was in there, thanks to some great details in the decoder manual.

What I wasn’t expecting was the word “snugly” to actually be defined as “there is no way this is ever going to fit without significant filing and trimming of the Kapton tape”.
The decoder I received looked just like the one above, but it seems like Digitrax is now adding a layer of Kapton tape to the bottom in order to prevent any electrical shorts where it might come in contact with the chassis. A good idea, but in a spot where it was already a “snug” fit, the Kapton tape (and the thickness of the decoder board itself) made it impossible to get it into the frame clips without risking damage to the decoder. I now wish I had taken a picture (can’t seem to find one online that shows the “new” placement of the Kapton tape), as well as wish I had broken out my caliper to measure the thickness of the old DC lightboard against the decoder.
Looking at the decoder itself and the traces, it seemed pretty clear that I could trim the Kapton tape right around the area where the decoder slipped into the frame clips, as that’s actually where it’s supposed to make contact with the chassis. Additionally, I broke out my smallest metal files, and gently enlarged the opening in the frame clip, making sure to wipe it clean and check it against the new board every few moments to ensure I didn’t enlarge the opening too much.
Finally happy with the fit (still “snug”, but not “so snug it’ll snap”), I was able to get it all seated.
Changing out the couplers turned out to be pretty easy as well. The new couplers just slide right in where the old ones were, and the existing coupler clips slid right over the top to hold them in place.
Leaving the shell off for a bit, I hooked it up to the programming track on my new (used) Digitrax DCS100 (https://www.digitrax.com/products/retired/command-stations-boosters/dcs100/), plugged in my new (used) Digitrax DT400 (https://www.digitrax.com/products/retired/throttles/dt400/) throttle, and proceeded to try and remember how this stuff works. Thankfully, my new (used) system came with the instructions! Before long, I was up and running with my locomotive correctly programmed to respond to “9205”, and even set a few CVs to ensure it would operate at a slower, more realistic “switcher” speed.
All said and done, the process wasn’t all that bad. Outside of having to break out my metal files, this really was a “drop-in decoder” friendly install.
Unfortunately, these Life-Like switchers aren’t proving to be as easy, but that’s a story for another day..
